In today’s article, I would like to demonstrate how we can use LendItems as a video library software.
Even though the times for home movie and video game rental providers like Blockbuster seem to be over (people stream movies these days), there are still many video libraries around. They are usually part of school and university libraries, but there are also many private collections.
Regardless of the ownership, many video libraries need software to track reservations, borrowing, and returns. And this is where LendItems comes in handy. Thanks to inventory management software you will be able to effortlessly track all your videos, manage reservations, communicate with the users, create different categories and much more.
More than video library software
Despite the fact that our system was not intended exclusively as video library inventory software (it can be used to track the lending of books, tools, musical instruments, laboratory equipment, and even guns) it has been effectively used by many libraries to manage videos, films, DVDs, CDs, video games, and tapes.
That is why I’ve decided to write this little post to encourage you to check LendItems’ capabilities and conveniently manage your videos. Before I will give you a general overview of how to use LendItems, and some information about its benefits and features.
LendItem’s key features
There are a lot of systems out there, but we think LendItems offers certain advantages. Here are some of the most important elements that can help you manage your video inventory efficiently and affordably.
- An unlimited number of item categories may be created with LendItems. This is perfect for any school since it allows us to track any other resources that might be in your library (like books, magazines, music disks, software discs, video games, etc).
- You can define precise borrowing time. Each library has got popular, sought after items. You can define a default borrowing time in days and hours, but it is also possible to overwrite this time for items in high demand. By doing so you will allow lending your items to more students.
- Email notifications. Both teachers and students are very busy these days, and it is very easy to lose track of videos that we had borrowed. LendItems will send automatic email reminders letting people know that they need to return the item. The frequency and timing of these messages are customizable.
- Fast video lending and returning with a barcode scanner. LendItems supports bar codes. Print out barcode stickers for the videos and give your students and teachers barcode library cards. Both lending and returning items will be very fast and simple.
- Fair pricing. Our video library software is very affordable, and you can test our LendItems for free. The prices depend on the size of your collection and the number of loans. This is fair as you always pay for your usage.
I hope this information encouraged you to at least check our software. Please click on the link below, register as a new user and add your first videos.
How to use LendItems as video library software
Before I start describing the process of using LendItems for managing videos, I will recommend using a barcode scanner. It is not strictly necessary but speeds up the process a lot. If you like our software and want to use it on a regular basis, please consider using a barcode scanner.
Create category
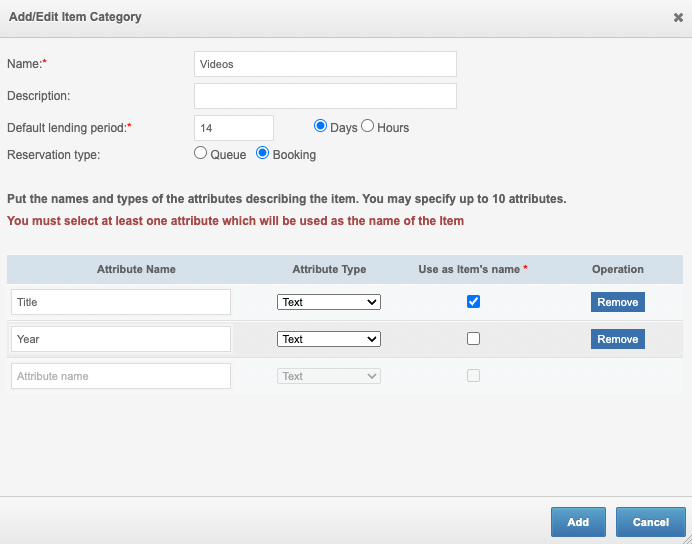
After you log in for the first time, you will see only one category, ‘Book’. So, depending on your needs, create one or more categories. To do so, you need to click Manage Items -> Manage Categories -> Add Item Category. Name your category (for instance ‘Videos’), specify the default lending period and reservation type (if in doubt leave Booking) add some Attributes (like language, what year the movie was released, etc.)

Add video to your category
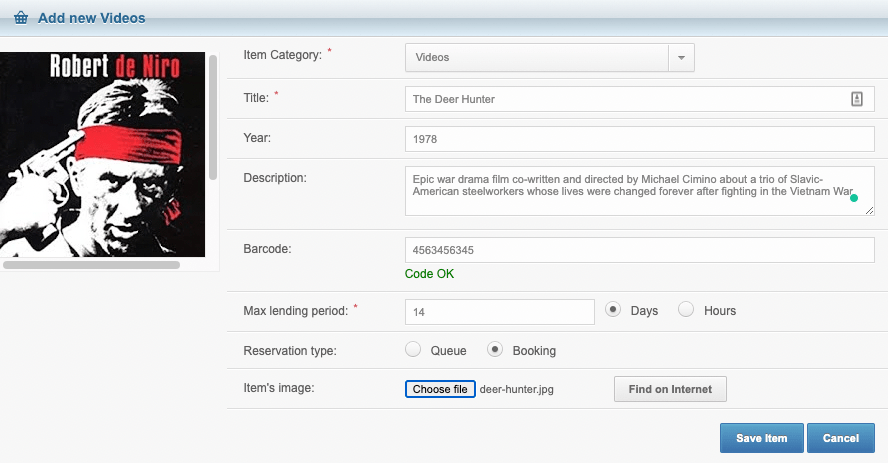
Once the category was created, add your first video. Head again to Manage Items -> New Item. Make sure you are in the correct category. If you see Book, use a dropdown menu to choose Videos.
Add the information to all attributes. I encourage you to use barcodes for all videos and use a barcode scanner to fill out the Barcode field. It is not required though and if you do not have stickers or a barcode scanner, you can leave it blank for the time being.

Repeat the process and add all your videos 🙂
Create users
OK, we have our first video in our library, but we also need some users to lend them to. Let’s create the first one. Head to Manage User -> New User.

Fill out all the fields. Again, if you have a barcode scanner you could scan a library card given to a student. The card will be associated with the user, and it will allow them to find him or her quickly in the system by scanning the card.
Lend and return videos
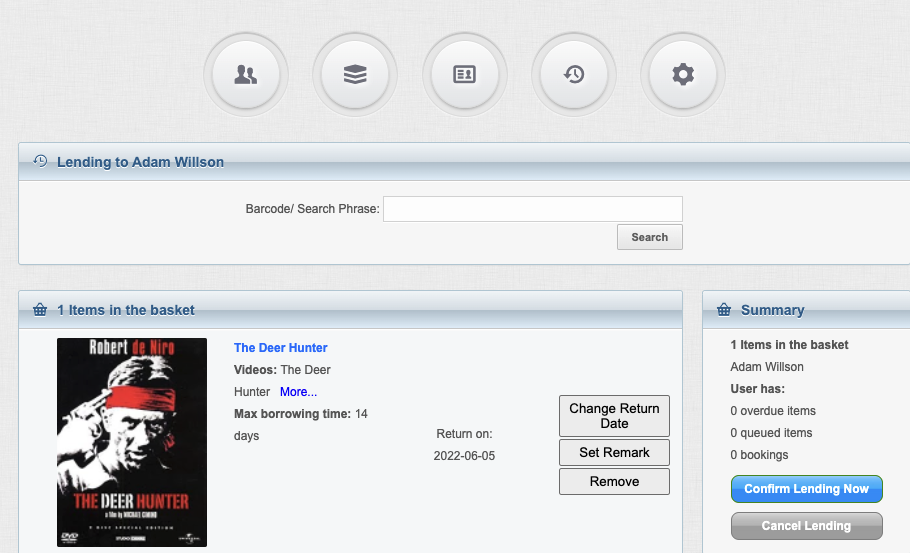
We have videos, we have users, and now it is time to start lending. Click Lend Items in the top menu. If you use the barcode scanner, scan the user’s card. If not, type the user’s name to identify him/her.
Once the user is found, scan the videos you want to lend if you use the barcodes (if not, type the video’s title and find it). Then, confirm the lending by clicking the blue button, Confirm Lending Now.

Repeat the same for all the videos you are lending.
Returning the videos is also straightforward. Click Return Items in the top menu and scan the videos or, if you do not use the barcode scanner, find them manually.
You can check currently borrowed items by clicking the Manage Item icon again.
Video tutorial
I have created a short video showing you the whole process. Please have a look:
I hope you have found it interesting and know now how to use LendItems as a video library software.
Please let me know if you have any questions regarding LendItems. You can use the comments below or contact us via email.
