Frequently Asked Questions
Please read below some frequently asked questions and answers.
You can also contact us if your question is not listed.

Can I try out your software for free?
You sure can 🙂 We would like to invite you to test our software for a full month, all features are active, no credit card is needed, takes 5 minutes to set up – click here(Sign up at the bottom of the page)
Where do I log in to my library?
You can log in as a user or owner/admin to your library – Click here
How can people sign up to my library?
People can not sign up, you have to invite them by:
– Login as admin or owner
– Click “Manage Users”
– Click the big red button in the middle of the screen “+ New User”
– Type in the details, and hit “Save User”
– From here our system will take over automatically and send an invitation with an activation link.
On the other hand, Google Apps organizations are automatically added when they first log in to LendItems, users are automatically added for organization libraries once they approve the app.
Can I use barcodes with LendItems?
Yes, you can use a barcode scanner that you connect via USB. Basically, you just need to be on the field that is expecting a barcode and then scan the barcode and it should then appear in the field that the cursor is on.
Here is some more information that you might find helpful.
Basically, you need two things
a) a means of creating barcodes
b) a scanner to read those barcodes
So the idea is you make a bunch of sticky barcode labels, each with a unique (and arbitrary) barcode and stick them to your items. Then you edit that item in LendItems, move to the barcode field, scan in the barcode stuck to that item, and save. Now the number on that barcode stuck to your item is linked to the item in LendItems.
For barcode generation, the application we have used is – Free Barcode Label Design Application. Free and very simple to use – Click here.
There is a video here that describes the use of this software – Click here (Please note that the start of the video shows an older version of LendItems).
We would suggest some low-cost bar code scanner, like this one – Click here
That you simply plug into your USB slot in your computer. Then while lending/returning items simply press the scan button on the scanner instead of typing in the code or name.
How can I see what is currently lent out?
The easy way is on the dashboard, this is the view that is shown first when you log in
– You will see 4 blue lines under the “Quick Search”, just click the “Borrowed items”, and you will see what is lent out
Or you can
– Navigate to “Manage Items”, and as you scroll through the items, you will see a banner “Currently Borrowed” under the item, if it is lent out.
Is it possible to generate a report showing which items have been borrowed the most frequently?
– Log in to your library as owner or admin
– Click “Manage Items”
– Click the red button, in the middle of the screen, “Import/Export”
– At the bottom, you will find “Export Lending History”
– Choose the dates
– Click “Export history”
Then your computer will automatically download a CSV file that you can open in Excel or another spreadsheet.
From there you can find all the information you need.
Can I see the users lending history?
Yes, you sure can!
– Log in as admin or owner
– Click “Manage Users”
– Locate the specific user, and click details to the right of the user
– Scroll down, and there you will find the lending history for this specific user
Is our data secure?
The LendItems application is run in the Google Cloud using Google Apps Engine and Google Cloud Datastore. Also, each library is in its own partition so there is no possibility of transference of data between libraries.
What is user history?
Here you can see a history of all borrowings

How can I search and reserve an item?
From the Dashboard (first view) you can browse for Items. Firstly, you filter the Items on their type using the ‘Item type’ drop-down list. You can then search for your Item in two ways: There are two ways of searching for an Item
Put a phrase to search, the system will check all Items of the selected Item Type and list all that contain your phrase in any of their attributes.
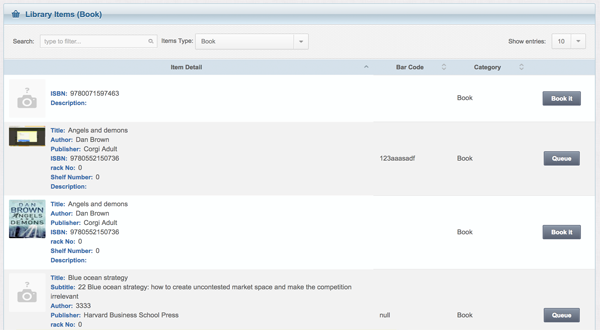
There are three types of reservations:
Daily Booking – you will specify the dates when you want to borrow the item and when you will bring the Item back
Hourly Booking – you will specify the dates and time of day when you want to borrow the item and when you will bring the Item back
Queue – you will not specify any dates. You will be put at the end of the queue for this Item and will be informed when your turn comes.
The type of reservation is configured per Item by the Administrator. Depending on the Reservation Type you will see different buttons for the Items. For both ‘Booking’ types the button will be called ‘Book it’ and will take you to a calendar where you select the time you want the Item for.
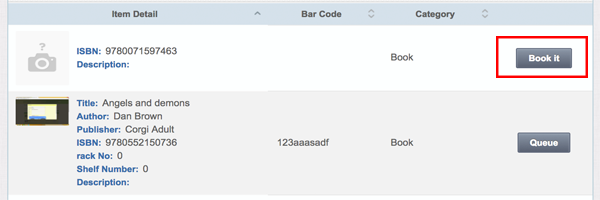
For the ‘Queue’ type the button will be called ‘Queue for’. After clicking it, it will ask for confirmation and display your position in the list. You cannot be in the queue for the same item more than once. At the bottom of each row it indicates how long the Item can be borrowed for. In the case of ‘Bookings’ you will not be able to reserve it for a longer period than displayed here.

How to add items?
This is the place where you add and modify Items stored in the LendItems system. The Items can be of any type you have defined in the Item Types section. Entering a new Item consists of the following;
- Enter the data for the various attributes defined for this Item Type
- Enter the description for this Item (optional)
- Scan in the barcode label which has been stuck to this Item (optional)
- Change lending period or Reservation Type (if default not wanted)
- Upload an image of the Item (optional)
If using barcodes, then before adding items into the library system, barcode labels should first be printed and one barcode label stuck to each Item. It does not matter which barcode you put on each item, as long as it is unique. For the Book Item, there is a special ‘auto-filling functionality’. (See details below). Note. If you have a library of books, and only one copy of each book, then you can use the existing ISBN barcode on the book to uniquely identify it, instead of having to stick a bar code label to it. This means for simple libraries of books, DVDs, etc that already have bar codes on them you can get away without having to print barcode labels. If however, you have two copies of the same book, then this would not work as each identifying bar code label has to be unique.
The Walk-through
1. Select the Item Type
Select the Item Type from the drop-down list. The form to set the attributes will be reloaded to allow setting of the Item Type’s specific attribute. 2. Enter the data for the attributes you have defined for that type. (yellow section in the screenshot)
Attributes marked with ‘*’ are the mandatory fields. The others are optional. 3. Enter the description (optional). (green section in the screenshot) 4. Assign the barcode (optional) (pink section in the screenshot)
Scan in the barcode for the Item. Using barcodes greatly simplifies the lending and returning of Items. 5. Change lending settings (optional). (blue section in the screenshot)
‘Max lending period’ and ‘Reservation Type’ are pre-set for you with the default values you have specified in the Item Type definition. If you want to use some different setting for the Item being added, you can change it here. 6. Press the ‘Save button’.
After providing the barcode, the focus goes to the ‘Save’ button (you can see a rectangular frame around the button). If you are using the barcode scanner, it is enough if you scan any barcode (maybe the same as the Item’s barcode) and this will have the effect of pressing the enter button and saving the new Item.

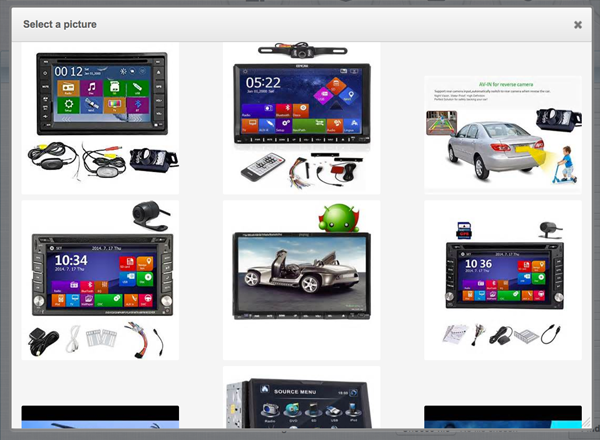
Adding images
You can select an image file manually by pressing ‘Choose File’ (or ‘Browse’ – depending on your Web Browser) button. You can also try to find an image on the Internet. When you press ‘Find on Internet’ button, the application will show you a couple of images from the Internet found for your Item. Simply click the image you choose and it will be assigned to your Item.
Editing and removing Items
To edit an existing Item, search for the Item using the bottom table and press the ‘Edit’ button. The main form will load up with this Item’s settings. Modify the Item and press ‘Save’ when done.

Removing
To remove an existing Item, search for the Item using the bottom table and press the ‘Remove’ button.

Books – automatic information filling
For the ‘Book’ Item there is a special auto-filling functionality. LendItems gets the information for the books using the book’s ISBN number.
To use the auto-filling functionality for the Books, either type in the ISBN number and press the ‘Autofill’ button (or press Enter), or simply scan the ISBN number (original book’s barcode on the back cover) with the barcode scanner. If LendItems is able to find the information for this book, it will fill all the information for you. Then scan the barcode label put on this book to link this barcode with this book, or as mentioned above, for simple libraries simply scan in the ISBN number again for this book’s barcode. Press ‘Save’ button, press the ‘Enter’ key or simply scan the barcode again to save this book. You are then ready to scan in the next Book’s ISBN number. If you want to do make changes to the auto-filled data, do it before pressing the ‘Save’ button. For Books that don’t have an ISBN number or the data for such number is not available, the information about the book must be typed in by hand.

How can I use autofill with the ISBN number?
For the ‘Book’ Item there is a special auto-filling functionality. LendItems gets the information for the books using the book’s ISBN number.
To use the auto-filling functionality for the Books, either type in the ISBN number and press the ‘Autofill’ button (or press Enter), or simply scan the ISBN number (original book’s barcode on the back cover) with the barcode scanner. If LendItems is able to find the information for this book, it will fill in all the information for you. Then scan the barcode label put on this book to link this barcode with this book, or as mentioned above, for simple libraries simply scan in the ISBN number again for this book’s barcode. Press ‘Save’ button, press the ‘Enter’ key or simply scan the barcode again to save this book. You are then ready to scan in the next Book’s ISBN number. If you want to do make changes to the auto-filled data, do it before pressing the ‘Save’ button. For Books that don’t have an ISBN number or the data for such number is not available, the information about the book must be typed in by hand.
Can I pay without creating a PayPal account?
Yes, you can! If you contact us through the below form, or through the “Contact Us” area in your library, ask for: “Yearly payment without creating a PayPal account”, and we will send you a money request to your e-mail address.
Can I import and export users and items?
You sure can 🙂 We have a user and item import/export function to/from CSV file, have a look at this video – click here
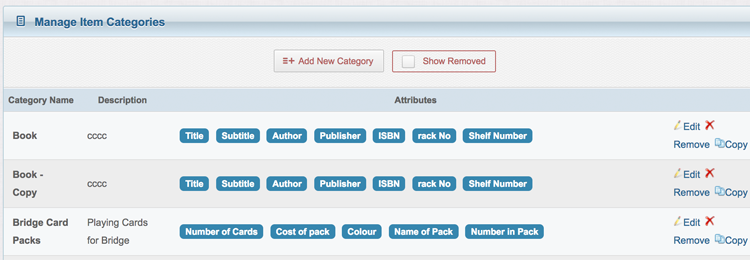
How to add item categories?
First, what is a category?
This system allows for many different types of Items(categories) to be stored, such as Books, CDs, Laptops, Cars, etc. You can also define your own categories.
While defining the category, you need to specify:
the name and description of the category
the default lending period (in days or hours)
the default type of reservation for Users (booking or queue)
the attributes for this category
and which attribute(s) will be used to name the Item
The Walk-through
1. Specify the name, description and the default lending settings.
Enter the name of the Item Type which will be used in various places such as all drop-down lists of Item Types.
Enter the description which will be used for informational purposes.
Enter the default lending period which is the longest time the User can reserve the Item for. Also this is the time that will be added to the date of lending to calculate the expected date of return.
Enter the default reservation type. There are two types of reservations: ‘queue’ and ‘booking’. If the Item’s reservation type is ‘Queue’, the Users will just be put at the end of the queue for this Item when they reserve it. If reserving an Item with ‘booking’, the Users will need to select the actual days/hours they wish to borrow the Item. (If the lending period is in hours instead of days, they will also need to specify the time of day.).
Both ‘Default Lending Period’ and ‘Default Reservation Type’ will be used for the Items of those types. However, you may overwrite these settings while entering in new Items.
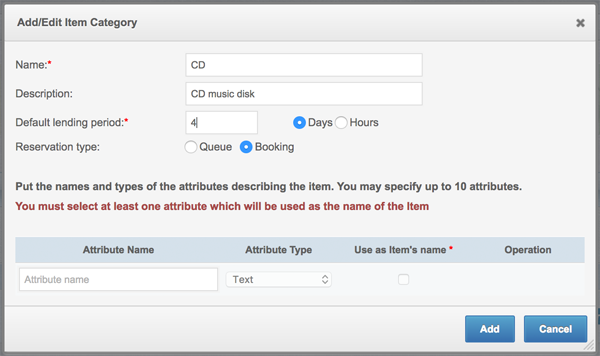
2. Defining the attributes.
You can specify up to 10 attributes describing the Item.
The available types are:
Text
Whole Number (e.g. 3, 52, 123, 2011 etc)
Decimal Number (e.g. 1.22, 43.10, 344.99)
Date (e.g. 2011-01-22 16:34)
At least one of the attributes needs to be marked as the Item’s name attribute. The content of this attribute will be displayed as the name of the Item (e.g. title for the Book – a single attribute as the name, make + model for the Car – multiple attributes as the name)

3. Reviewing and removing.
All defined Item Types are listed at the bottom of the page. In that table, you can also remove the existing Item Types. An Item Type can be removed by clicking on the ‘Remove’ button. Warning. Removing an Item Type removes all Items of this type as well.
How can I change the amount of time that an item can be lent for?
- Log in to your library as owner or admin
- Click “Manage items”
- Find the item in the list that you want to tweak
- Click the “Edit” button to the right of the item
- At the pop up screen, tweak “Max lending period” to the desired lend time
How to manage items?
Browsing Items
On the “Manage Items” page you can easily find items, see their details and find out whether the Items has been lent to somebody or is available for lending. When you select an item in the table, it will show more details on the right from the table.
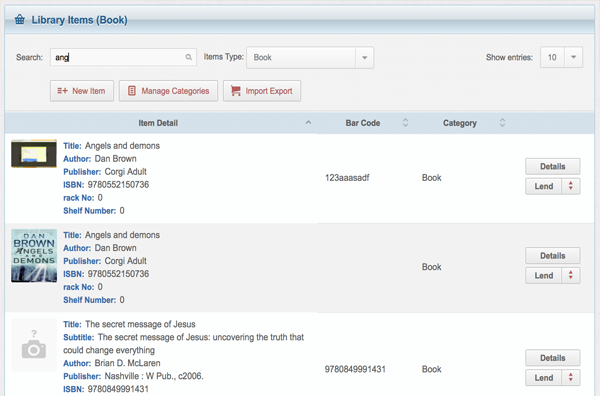
Searching
You can search for your Item using ‘Simple search’ – where you simply put a phrase to search (e.g. part of a title, author, publisher etc).
Sorting
You can sort the content of the table by selecting which attribute the Items should be sorted. Using the icon on the right, you can select ascending/descending order.

How to get admin privileges?
- Log in to your library as admin or owner
- Navigate to “Manage Users”
- Find the user that you want to give admin privileges
- Click the “Actions” button to the right of the user, and choose “Make Admin”
Do you have a white label version of LendItems?
Yes, we do have a white label version of LendItems which includes the following features:
– Customized library interface with your company/business or institute logo
– Customized look and feel according to the company’s/institute’s website or any preferred colour scheme
– Location-based items – You can manage your items according to your different library locations
– Custom support e-mail recipients – You choose who receives help e-mails sent by library users
– Custom reply-to address for auto-generated reminder emails
– Provision to print checkout sheet with custom template and item details before lending items
– Optional terms of use page to display and ask for acknowledgement on terms before booking or queuing an item
Custom templates for emails that include custom title, contents and signatures of:
– Overdue reminder
– Item reservation email
– Queue confirmation email
– Item booking email
– Item cancellation
– Item return
– Item ready for loan email
and many more…
The charge for this is an extra $30/month
Where is my data stored and is it safe?
YES, your data is safe!
Read more about where it’s stored, and how safe it is – Click here
Are you GDPR compliant?
We are proud to say: Yes we are!
You can read more about it – Click here
Can I download a file with my items?
Yes, you can export items by:
- Log in as owner or admin
- Navigate to: “Manage items”
- Click the red square button in the middle of the screen “Import/Export”
- Now choose the category you want to be exported
- And click “Export items”
Our system will export a list for you, and your computer will automatically start downloading this file.
Now you can open this in Excel or another spreadsheet program
Can I lend multiple items at once?
Yes you can, try this:
- Log in to your library as admin or owner
- Click the round button at the top middle of the screen “LendItems”
- Then find and choose the user you want to lend to, in the field User’s Name/Barcode: / or pick user from the drop down list
- then find the items one by one, searching and clicking “add to list”
- when you have found and added all the items you want to lend to this user, then click the blue button on the right “Confirm lending now”
The system will show a popup message: Successfully lent item(s) to the user Note: Lending multiple items like this, will only count as 1 loan in your plan